Fan de la TI-83 Premium CE (ou hors de France de la TI-84 Plus CE), aujourd'hui nous te reparlons de la Zero ZGC4, le clone non officiel qui serait censé sortir pour la rentrée 2025.
Nous avons reçu une nouvelle mise à jour 2.23 pour la ZGC4, également compatible avec le prototype précédent ZGC3.
Plus précisément, nous passons donc de la version 2.22.0 du 11 décembre 2024 à la version 2.23.0 du 25 mars 2025.
Dans la dernière version, nous regrettions que la programmation Python qui devenait enfin fonctionnelle, n'offre pas encore de bibliothèque graphique.
 Et bien portons toute notre attention sur la programmation Python, car cela a visiblement bougé une nouvelle fois avec cette dernière mise à jour 2.23.
En effet l'interpréteur Micropython utilisé a été lui aussi mis à jour, passant de la version 1.22.0 sortie le 27 décembre 2023 à la version 1.23.0 sortie le 31 mai 2024.

 Nous n'avons pas besoin de chercher bien loin, un simple appel
 help("modules") nous indique que le Python de la Zero dispose désormais d'une bibliothèque standard supplémentaire par rapport à la version précédente, lvgl, qui est justement une bibliothèque graphique !Rappelons que niveau graphismes en Python, les calculatrices concurrents répartissent habituellement les fonctionnalités sur 3 bibliothèques :
- une bibliothèque de tracé par pixels (habituellement propriétaire, c'est-à-dire spécifique à chaque marque ou pire modèle sans compatibilité du code entre les marques ou modèles)
- une bibliothèque de tracé dans un repère (matplotlib, standard)
- une bibliothèque de tracé à la tortue (turtle, standard)
Avec lvgl, la Zero nous offre déjà le gros avantage d'une bibliothèque de tracé par pixels standard !
À partir de l'objet écran
Exemple 1 :
Exemple 2:
À partir de l'objet écran
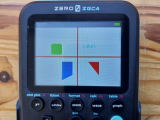
lvgl.scr_act(), les méthodes .get_width() et .get_height() nous permettent de déterminer que nous contrôlons une zone graphique de 320×218 pixels, la barre de titre permanente occupant donc 22 pixels de hauteur.Exemple 1 :
- Code: Select all
import lvgl as lv

scr = lv.scr_act()

# Height of persistent header on screen
header_height = lv.get_header_height()

print("Screen width: ", scr.get_width())
print("Screen height: ", scr.get_height())
print("Header height: ", header_height)

def draw_cb(obj, mask, mode):
    if mode == lv.DESIGN.DRAW_MAIN:
        objArea = lv.area_t()
        obj.get_coords(objArea)

        # Fill bg
        bgColor = lv.color_make(0xFF, 0xFF, 0xFF)
        lv.draw_fill(objArea, mask, bgColor, lv.OPA._100)

        styleLine = lv.style_t()
        styleLine.copy(lv.style_plain)
        styleLine.line.color = lv.color_make(0xFF, 0x00, 0x00)
        styleLine.line.width = 3
        styleLine.line.rounded = 1

        # Draw hor line (in coordinates of display (320x240))
        horLinePoint1 = { "x": objArea.x1, "y": objArea.y1 + int(objArea.get_height() / 2) }
        horLinePoint2 = { "x": objArea.x2, "y": objArea.y1 + int(objArea.get_height() / 2) }
        lv.draw_line(horLinePoint1, horLinePoint2, mask, styleLine, lv.OPA._100)

        # Draw ver line (in coordinates of display (320x240))
        verLinePoint1 = { "x": objArea.x1 + int(objArea.get_width() / 2), "y": objArea.y1 }
        verLinePoint2 = { "x": objArea.x1 + int(objArea.get_width() / 2), "y": objArea.y2 }
        lv.draw_line(verLinePoint1, verLinePoint2, mask, styleLine, lv.OPA._100)

        # Draw four pixels
        pxColor = lv.color_make(0x00, 0x00, 0x00)
        lv.draw_px(objArea.x1 + 50, objArea.y1 + 50, mask, pxColor, lv.OPA._100)
        lv.draw_px(objArea.x1 + 50, objArea.y2 - 50, mask, pxColor, lv.OPA._100)
        lv.draw_px(objArea.x2 - 50, objArea.y1 + 50, mask, pxColor, lv.OPA._100)
        lv.draw_px(objArea.x2 - 50, objArea.y2 - 50, mask, pxColor, lv.OPA._100)

        # Draw rectangle
        styleRect = lv.style_t()
        styleRect.copy(lv.style_plain)
        styleRect.body.main_color = lv.color_make(0x00, 0xFF, 0x00)
        styleRect.body.grad_color = lv.color_make(0x00, 0xFF, 0x00)
        styleRect.body.radius = 5

        rectArea = lv.area_t()
        rectArea.set(objArea.x1 + 60, objArea.y1 + 60, objArea.x1 + 100, objArea.y1 + 100)
        lv.draw_rect(rectArea, mask, styleRect, lv.OPA._100)

        # Draw label
        labelStyle = lv.style_t()
        labelStyle.copy(lv.style_plain)
        labelStyle.text.color = lv.color_make(0x00, 0xFF, 0xFF)

        labelOffset = {"x": 0, "y": 0}

        labelArea = lv.area_t()
        labelArea.set(objArea.x1 + 180, objArea.y1 + 60, objArea.x2, objArea.y1 + 80)
        lv.draw_label(labelArea, mask, labelStyle, lv.OPA._100, "Label", 0, labelOffset, None, None, lv.BIDI_DIR.LTR)

        # Draw triangle
        styleRect.body.main_color = lv.color_make(0xFF, 0x00, 0x00)
        trigPoints = [ {"x":200, "y":150},
                        {"x":240, "y":150},
                        {"x":240, "y":200}]
        lv.draw_triangle(trigPoints, mask, styleRect, lv.OPA._100)

        # Draw polygon
        styleRect.body.main_color = lv.color_make(0x00, 0x00, 0xFF)
        polyPoints = [ {"x":100, "y":150},
                        {"x":140, "y":150},
                        {"x":140, "y":200},
                        {"x":100, "y":220}]
        lv.draw_polygon(polyPoints, len(polyPoints), mask, styleRect, lv.OPA._100)

        return True
    else:
        return False

scr.set_design_cb(draw_cb)

print("Main draw finished")

lv.show()
Exemple 2:
- Code: Select all
import lvgl as lv

# Create an array for the points of the line
line_points = [ {"x":5, "y":5},
                {"x":70, "y":70},
                {"x":120, "y":10},
                {"x":180, "y":60},
                {"x":240, "y":10}]

# Create new style (thick dark blue)
style_line = lv.style_t()
style_line.copy(lv.style_plain)
style_line.line.color = lv.color_make(0x00, 0x3b, 0x75)
style_line.line.width = 3
style_line.line.rounded = 1

# Copy the previous line and apply the new style
line1 = lv.line(lv.scr_act(), None)
line1.set_points(line_points, len(line_points))      # Set the points
line1.set_style(lv.line.STYLE.MAIN, style_line)
line1.align(None, lv.ALIGN.CENTER, 0, 0)

lv.show()
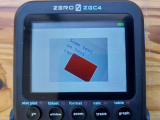
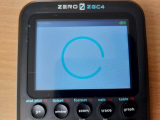
lvgl se révèle être une bibliothèque de tracé par pixels hautement poussée, encore mieux que le double buffering des Casio et TI-Nspire CX II, nous manipulons hors écran autant de calques que nous voulons, comme sur HP Prime !
Exemple :
Exemple :
- Code: Select all
import lvgl as lv

CANVAS_WIDTH  = 200
CANVAS_HEIGHT = 150

style = lv.style_t()
style.copy(lv.style_plain)
style.body.main_color = lv.color_make(0xFF,0,0)
style.body.grad_color = lv.color_make(0x80,0,0)
style.body.radius = 4
style.body.border.width = 2
style.body.border.color = lv.color_make(0xFF,0xFF,0xFF)
style.body.shadow.color = lv.color_make(0xFF,0xFF,0xFF)
style.body.shadow.width = 4
style.line.width = 2
style.line.color = lv.color_make(0,0,0)
style.text.color = lv.color_make(0,0,0xFF)

# CF.TRUE_COLOR requires 4 bytes per pixel
cbuf = bytearray(CANVAS_WIDTH * CANVAS_HEIGHT * 4)

canvas = lv.canvas(lv.scr_act(), None)
canvas.set_buffer(cbuf, CANVAS_WIDTH, CANVAS_HEIGHT, lv.img.CF.TRUE_COLOR)
canvas.align(None, lv.ALIGN.CENTER, 0, 0)
canvas.fill_bg(lv.color_make(0xC0, 0xC0, 0xC0))

canvas.draw_rect(70, 60, 100, 70, style)

canvas.draw_text(40, 20, 100, style, "Some text on text canvas", lv.label.ALIGN.LEFT)

# Test the rotation. It requires an other buffer where the original image is stored.
# So copy the current image to buffer and rotate it to the canvas
img = lv.img_dsc_t()
img.data = cbuf[:]
img.header.cf = lv.img.CF.TRUE_COLOR
img.header.w = CANVAS_WIDTH
img.header.h = CANVAS_HEIGHT

canvas.fill_bg(lv.color_make(0xC0, 0xC0, 0xC0))
canvas.rotate(img, 30, 0, 0, CANVAS_WIDTH // 2, CANVAS_HEIGHT // 2)

lv.show()
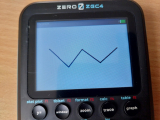
Mais ce n'est pas tout… Nul besoin de changer de bibliothèque ici, deux en un, lvgl permet également les tracés dans un repère comme matplotlib !
Exemple :
Exemple :
- Code: Select all
import lvgl as lv

# Create a chart
chart = lv.chart(lv.scr_act(), None)
chart.set_size(200, 150)
chart.align(None, lv.ALIGN.CENTER, 0, 0)
chart.set_type(lv.chart.TYPE.POINT | lv.chart.TYPE.LINE)   # Show lines and points too
chart.set_series_opa(lv.OPA._70)                           # Opacity of the data series
chart.set_series_width(4)                                  # Line width and point radious

chart.set_range(0, 100)

# Add two data series
ser1 = chart.add_series(lv.color_make(0xFF, 0x00, 0x00))
ser2 = chart.add_series(lv.color_make(0x00, 0x80, 0x00))

# Set points on 'dl1'
chart.set_points(ser1, [10, 10, 10, 10, 10, 10, 10, 30, 70, 90])

# Set points on 'dl2'
chart.set_points(ser2, [90, 70, 65, 65, 65, 65, 65, 65, 65, 65])

lv.show()
print("LVGL drawing finished")
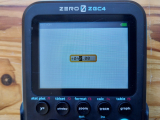
Mais lvgl c'est encore bien plus que cela, car il s'agit en fait d'une bibliothèque graphique orientée objet. Tu peux en quelques lignes créer nombre d'objets graphiques différents ! 👍
Exemple : boutons poussoir

Exemple : boîtes à cocher
Exemple : interrupteurs à bascule
Exemple : barre de progression horizontale

Exemple : barre de progression ou d'attente chargement circulaire
Exemple : champ de saisie numérique
Exemple : jauge 1

Exemple : jauge 2
Exemple : curseur
Exemple : liste de choix

Exemple : boutons poussoir
- Code: Select all
import lvgl as lv

def event_handler(obj, event):
    if event == lv.EVENT.CLICKED:
        print("Button clicked")

btn1 = lv.btn(lv.scr_act(), None)
btn1.align(None, lv.ALIGN.CENTER, 0, -40)
btn1.set_event_cb(event_handler)
label = lv.label(btn1, None)
label.set_text("Button")

btn2 = lv.btn(lv.scr_act(), None)
# callback can be lambda:
btn2.set_event_cb(lambda obj, event: print("Toggled") if event == lv.EVENT.VALUE_CHANGED else None)
btn2.align(None, lv.ALIGN.CENTER, 0, 40)
btn2.set_toggle(True)
btn2.toggle()
btn2.set_fit2(lv.FIT.NONE, lv.FIT.TIGHT)

label = lv.label(btn2, None)
label.set_text("Toggled")

# Keyboard register
keyboardDriver = lv.indev_drv_t()
keyboardDriver.init()
keyboardDriver.type = lv.INDEV_TYPE.KEYPAD
keyboardDriver.read_cb = lv.keypad_read
keyboard = keyboardDriver.register()

# Create groupe for buttons
group = lv.group_create()
group.add_obj(btn1)
group.add_obj(btn2)
keyboard.set_group(group)

lv.show()
print("LVGL drawing finished")
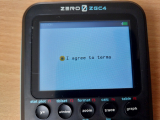
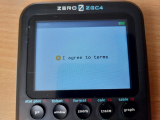
Exemple : boîtes à cocher
- Code: Select all
import lvgl as lv

# Keyboard register
keyboardDriver = lv.indev_drv_t()
keyboardDriver.init()
keyboardDriver.type = lv.INDEV_TYPE.KEYPAD
keyboardDriver.read_cb = lv.keypad_read
keyboard = keyboardDriver.register()

# Create groupe for keyboard handled objects
group = lv.group_create()
keyboard.set_group(group)

def event_handler(obj, event):
    if event == lv.EVENT.VALUE_CHANGED:
        print("State: %s" % ("Checked" if obj.is_checked() else "Unchecked"))

cb = lv.cb(lv.scr_act(), None)
cb.set_text("I agree to terms")
cb.align(None, lv.ALIGN.CENTER, 0, 0)
cb.set_event_cb(event_handler)

group.add_obj(cb)

lv.show()
print("LVGL drawing finished")
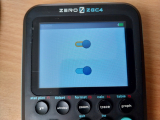
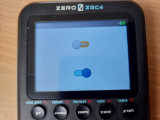
Exemple : interrupteurs à bascule
- Code: Select all
import lvgl as lv

# Keyboard register
keyboardDriver = lv.indev_drv_t()
keyboardDriver.init()
keyboardDriver.type = lv.INDEV_TYPE.KEYPAD
keyboardDriver.read_cb = lv.keypad_read
keyboard = keyboardDriver.register()

# Create groupe for keyboard handled objects
group = lv.group_create()
keyboard.set_group(group)

def event_handler(obj, event):
    if event == lv.EVENT.VALUE_CHANGED:
        print("State: %s" % ("On" if obj.get_state() else "Off"))

# Create styles for the switch
bg_style = lv.style_t()
indic_style = lv.style_t()
knob_on_style = lv.style_t()
knob_off_style = lv.style_t()

bg_style.copy(lv.style_pretty)
bg_style.body.radius = 800
bg_style.body.padding.top = 6
bg_style.body.padding.bottom = 6

indic_style.copy(lv.style_pretty_color)
indic_style.body.radius = 800
indic_style.body.main_color = lv.color_hex(0x9fc8ef)
indic_style.body.grad_color = lv.color_hex(0x9fc8ef)
indic_style.body.padding.left = 0
indic_style.body.padding.right = 0
indic_style.body.padding.top = 0
indic_style.body.padding.bottom = 0

knob_off_style.copy(lv.style_pretty)
knob_off_style.body.radius = 800
knob_off_style.body.shadow.width = 4
knob_off_style.body.shadow.type = lv.SHADOW.BOTTOM

knob_on_style.copy(lv.style_pretty_color)
knob_on_style.body.radius = 800
knob_on_style.body.shadow.width = 4
knob_on_style.body.shadow.type = lv.SHADOW.BOTTOM

# Create a switch and apply the styles
sw1 = lv.sw(lv.scr_act(), None)
sw1.set_style(lv.sw.STYLE.BG, bg_style)
sw1.set_style(lv.sw.STYLE.INDIC, indic_style)
sw1.set_style(lv.sw.STYLE.KNOB_ON, knob_on_style)
sw1.set_style(lv.sw.STYLE.KNOB_OFF, knob_off_style)
sw1.align(None, lv.ALIGN.CENTER, 0, -50)
sw1.set_event_cb(event_handler)

# Copy the first switch and turn it ON
sw2 = lv.sw(lv.scr_act(), None)
sw2.set_style(lv.sw.STYLE.BG, bg_style)
sw2.set_style(lv.sw.STYLE.INDIC, indic_style)
sw2.set_style(lv.sw.STYLE.KNOB_ON, knob_on_style)
sw2.set_style(lv.sw.STYLE.KNOB_OFF, knob_off_style)
sw2.on(lv.ANIM.ON)
sw2.align(None, lv.ALIGN.CENTER, 0, 50)
sw2.set_event_cb(lambda o,e: None)

group.add_obj(sw1)
group.add_obj(sw2)

lv.show()
Exemple : barre de progression horizontale
- Code: Select all
import lvgl as lv

bar1 = lv.bar(lv.scr_act(), None)
bar1.set_size(200, 30)
bar1.align(None, lv.ALIGN.CENTER, 0, 0)
bar1.set_anim_time(2500)
bar1.set_value(100, lv.ANIM.ON)

lv.show()
print("LVGL drawing finished")
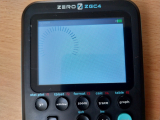
Exemple : barre de progression ou d'attente chargement circulaire
- Code: Select all
import lvgl as lv

# Create style for the Arcs
style = lv.style_t()
style.copy(lv.style_plain)
style.line.color = lv.color_make(0x00, 0xFF, 0xFF) # Arc color
style.line.width = 8                      # Arc width

# Create an Arc
arc = lv.arc(lv.scr_act(), None)
arc.set_style(lv.arc.STYLE.MAIN, style)   # Use the new style
arc.set_angles(90, 60)
arc.set_size(150, 150)
arc.align(None, lv.ALIGN.CENTER, 0, 0)

lv.show()
print("LVGL drawing finished")
Exemple : champ de saisie numérique
- Code: Select all
import lvgl as lv

# Keyboard register
keyboardDriver = lv.indev_drv_t()
keyboardDriver.init()
keyboardDriver.type = lv.INDEV_TYPE.KEYPAD
keyboardDriver.read_cb = lv.keypad_read
keyboard = keyboardDriver.register()

# Create groupe for keyboard handled objects
group = lv.group_create()
keyboard.set_group(group)

def event_handler(obj, event):
    if event == lv.EVENT.VALUE_CHANGED:
        print("Value: %d" % obj.get_value())
    elif event == lv.EVENT.CLICKED:
        # For simple test: Click the spinbox to increment its value
        obj.increment()

spinbox = lv.spinbox(lv.scr_act(), None)
spinbox.set_digit_format(5, 3)
spinbox.step_prev()
spinbox.set_width(100)
spinbox.align(None, lv.ALIGN.CENTER, 0, 0)
spinbox.set_event_cb(event_handler)

group.add_obj(spinbox)

lv.show()
Exemple : jauge 1
- Code: Select all
import lvgl as lv

# Create a style
style = lv.style_t()
style.copy(lv.style_pretty_color)
style.body.main_color = lv.color_hex3(0x666)     # Line color at the beginning
style.body.grad_color =  lv.color_hex3(0x666)    # Line color at the end
style.body.padding.left = 10                     # Scale line length
style.body.padding.inner = 8                     # Scale label padding
style.body.border.color = lv.color_hex3(0x333)   # Needle middle circle color
style.line.width = 3
style.text.color = lv.color_hex3(0xFFFFFF)
style.line.color = lv.color_hex3(0xF00)          # Line color after the critical value

# Describe the color for the needles
needle_colors = [
    lv.color_make(0x00, 0x00, 0xFF),
    lv.color_make(0xFF, 0xA5, 0x00),
    lv.color_make(0x80, 0x00, 0x80)
]

# Create a gauge
gauge1 = lv.gauge(lv.scr_act(), None)
gauge1.set_style(lv.gauge.STYLE.MAIN, style)
gauge1.set_needle_count(len(needle_colors), needle_colors)
gauge1.set_size(150, 150)
gauge1.align(None, lv.ALIGN.CENTER, 0, 20)

# Set the values
gauge1.set_value(0, 10)
gauge1.set_value(1, 20)
gauge1.set_value(2, 30)

lv.show()
print("LVGL drawing finished")
Exemple : jauge 2
- Code: Select all
import lvgl as lv

# Create a style for the line meter
style_lmeter = lv.style_t()
style_lmeter.copy(lv.style_pretty_color)
style_lmeter.line.width = 2
style_lmeter.line.color = lv.color_hex(0xc0c0c0)              # Silver
style_lmeter.body.main_color = lv.color_hex(0x91bfed)         # Light blue
style_lmeter.body.grad_color = lv.color_hex(0x04386c)         # Dark blue
style_lmeter.body.padding.left = 16                           # Line length

# Create a line meter
lmeter = lv.lmeter(lv.scr_act(), None)
lmeter.set_range(0, 100)                    # Set the range
lmeter.set_value(80)                        # Set the current value
lmeter.set_scale(240, 31)                   # Set the angle and number of lines
lmeter.set_style(lv.lmeter.STYLE.MAIN, style_lmeter)          # Apply the new style
lmeter.set_size(150, 150)

lv.show()
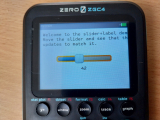
Exemple : curseur
- Code: Select all
import lvgl as lv

# Keyboard register
keyboardDriver = lv.indev_drv_t()
keyboardDriver.init()
keyboardDriver.type = lv.INDEV_TYPE.KEYPAD
keyboardDriver.read_cb = lv.keypad_read
keyboard = keyboardDriver.register()

# Create groupe for keyboard handled objects
group = lv.group_create()
keyboard.set_group(group)

# Create a label below the slider
slider_label = lv.label(lv.scr_act(), None)
slider_label.set_text("0")
slider_label.set_auto_realign(True)

def slider_event_cb(obj, event):
    if event == lv.EVENT.VALUE_CHANGED:
        slider_label.set_text("%u" % obj.get_value())

# Create a slider in the center of the display
slider = lv.slider(lv.scr_act(), None)
slider.set_width(200)
slider.align(None, lv.ALIGN.CENTER, 0, 0)
slider.set_event_cb(slider_event_cb)
slider.set_range(0, 100)

slider_label.align(slider, lv.ALIGN.OUT_BOTTOM_MID, 0, 10)

# Create an informative label
info = lv.label(lv.scr_act(), None)
info.set_text("""Welcome to the slider+label demo!
Move the slider and see that the label
updates to match it.""")
info.align(None, lv.ALIGN.IN_TOP_LEFT, 10, 10)

group.add_obj(slider)

lv.show()
Exemple : liste de choix
- Code: Select all
import lvgl as lv

# Keyboard register
keyboardDriver = lv.indev_drv_t()
keyboardDriver.init()
keyboardDriver.type = lv.INDEV_TYPE.KEYPAD
keyboardDriver.read_cb = lv.keypad_read
keyboard = keyboardDriver.register()

# Create groupe for keyboard handled objects
group = lv.group_create()
keyboard.set_group(group)

def event_handler(obj, event):
    if event == lv.EVENT.VALUE_CHANGED:
        option = " "*10
        obj.get_selected_str(option, len(option))
        print("Selected month: %s" % option.strip())

roller1 = lv.roller(lv.scr_act(), None)
roller1.set_options("\n".join([
                    "January",
                    "February",
                    "March",
                    "April",
                    "May",
                    "June",
                    "July",
                    "August",
                    "September",
                    "October",
                    "November",
                    "December"]), lv.roller.MODE.INIFINITE)

roller1.set_visible_row_count(4)
roller1.align(None, lv.ALIGN.CENTER, 0, 0)
roller1.set_event_cb(event_handler)

group.add_obj(roller1)

lv.show()
Et bien évidemment, lvgl permet d'organiser nombre de ces objets graphiques de façon complexe et d'en gérer les différents événements ! 👍
Exemple : boîte de dialogue de confirmation ou annulation
Exemple : Grille de boutons poussoir
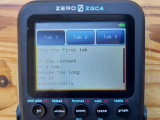
Exemple : Vues par onglets
Exemple : zone à défiler
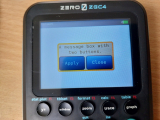
Exemple : boîte de dialogue de confirmation ou annulation
- Code: Select all
import lvgl as lv

# Keyboard register
keyboardDriver = lv.indev_drv_t()
keyboardDriver.init()
keyboardDriver.type = lv.INDEV_TYPE.KEYPAD
keyboardDriver.read_cb = lv.keypad_read
keyboard = keyboardDriver.register()

# Create groupe for keyboard handled objects
group = lv.group_create()
keyboard.set_group(group)

def event_handler(obj, event):
    if event == lv.EVENT.VALUE_CHANGED:
        print("Button: %s" % lv.mbox.get_active_btn_text(obj))

mbox1 = lv.mbox(lv.scr_act(), None)
mbox1.set_text("A message box with two buttons.")
mbox1.add_btns(["Apply", "Close", ""])
mbox1.set_width(200)
mbox1.set_event_cb(event_handler)
mbox1.align(None, lv.ALIGN.CENTER, 0, 0)  # Align to the corner

group.add_obj(mbox1)

lv.show()
Exemple : Grille de boutons poussoir
- Code: Select all
import lvgl as lv

# Keyboard register
keyboardDriver = lv.indev_drv_t()
keyboardDriver.init()
keyboardDriver.type = lv.INDEV_TYPE.KEYPAD
keyboardDriver.read_cb = lv.keypad_read
keyboard = keyboardDriver.register()

# Create groupe for keyboard handled objects
group = lv.group_create()
keyboard.set_group(group)

def event_handler(obj, event):
    if event == lv.EVENT.VALUE_CHANGED:
        txt = obj.get_active_btn_text()
        print("%s was pressed" % txt)

btnm1 = lv.btnm(lv.scr_act(), None)
btnm1.set_map( ["1", "2", "3", "4", "5", "\n",
            "6", "7", "8", "9", "0", "\n",
            "Action1", "Action2", ""])
btnm1.set_btn_width(10, 2)        # Make "Action1" twice as wide as "Action2"
btnm1.align(None, lv.ALIGN.CENTER, 0, 0)
btnm1.set_event_cb(event_handler)

group.add_obj(btnm1)

lv.show()
print("LVGL drawing finished")
Exemple : Vues par onglets
- Code: Select all
import lvgl as lv

# Keyboard register
keyboardDriver = lv.indev_drv_t()
keyboardDriver.init()
keyboardDriver.type = lv.INDEV_TYPE.KEYPAD
keyboardDriver.read_cb = lv.keypad_read
keyboard = keyboardDriver.register()

# Create groupe for keyboard handled objects
group = lv.group_create()
keyboard.set_group(group)

# Create a Tab view object
tabview = lv.tabview(lv.scr_act(), None)

# Add 3 tabs (the tabs are page (lv_page) and can be scrolled
tab1 = tabview.add_tab("Tab 1")
tab2 = tabview.add_tab("Tab 2")
tab3 = tabview.add_tab("Tab 3")

# Add content to the tabs
label = lv.label(tab1, None)
label.set_text("""This the first tab

If the content
of a tab
become too long
the it
automatically
become
scrollable.""")

label = lv.label(tab2, None)
label.set_text("Second tab")

label = lv.label(tab3, None)
label.set_text("Third tab")

group.add_obj(tabview)

lv.show()
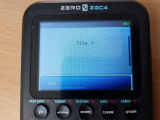
Exemple : zone à défiler
- Code: Select all
import lvgl as lv

# Keyboard register
keyboardDriver = lv.indev_drv_t()
keyboardDriver.init()
keyboardDriver.type = lv.INDEV_TYPE.KEYPAD
keyboardDriver.read_cb = lv.keypad_read
keyboard = keyboardDriver.register()

# Create groupe for keyboard handled objects
group = lv.group_create()
keyboard.set_group(group)

valid_pos = [{"x":0, "y": 0}, {"x": 0, "y": 1}, {"x": 1,"y": 1}]

# resolution of the screen
HOR_RES = lv.scr_act().get_width()
VER_RES = lv.scr_act().get_height()

tileview = lv.tileview(lv.scr_act(), None)
tileview.set_valid_positions(valid_pos, len(valid_pos))
tileview.set_edge_flash(True)

# Tile1: just a label
tile1 = lv.obj(tileview, None)
tile1.set_size(HOR_RES, VER_RES)
tile1.set_style(lv.style_pretty)
tileview.add_element(tile1)

label = lv.label(tile1, None)
label.set_text("Tile 1")
label.align(None, lv.ALIGN.CENTER, 0, 0)

# Tile2: a list
lst = lv.list(tileview, None)
lst.set_size(HOR_RES, VER_RES)
lst.set_pos(0, VER_RES)
lst.set_scroll_propagation(True)
lst.set_sb_mode(lv.SB_MODE.OFF)
tileview.add_element(lst)

list_btn = lst.add_btn(None, "One")
tileview.add_element(list_btn)

list_btn = lst.add_btn(None, "Two")
tileview.add_element(list_btn)

list_btn = lst.add_btn(None, "Three")
tileview.add_element(list_btn)

list_btn = lst.add_btn(None, "Four")
tileview.add_element(list_btn)

list_btn = lst.add_btn(None, "Five")
tileview.add_element(list_btn)

list_btn = lst.add_btn(None, "Six")
tileview.add_element(list_btn)

list_btn = lst.add_btn(None, "Seven")
tileview.add_element(list_btn)

list_btn = lst.add_btn(None, "Eight")
tileview.add_element(list_btn)

# Tile3: a button
tile3 = lv.obj(tileview, None)
tile3.set_size(HOR_RES, VER_RES)
tile3.set_pos(HOR_RES, VER_RES)
tileview.add_element(tile3)

btn = lv.btn(tile3, None)
btn.align(None, lv.ALIGN.CENTER, 0, 0)

label = lv.label(btn, None)
label.set_text("Button")

group.add_obj(tileview)

lv.show()
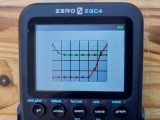
Clairement niveau graphismes Python, dire que la Zero rattrape aujourd'hui les TI-83/84 serait un euphémisme. Bien au-delà, elle les dépasse et les laisse loin derrière ainsi que l'ensemble de la concurrence ! 🥳


")


, reçois gratuitement 1 exemplaire de test de la TI-82 Advanced Edition Python. À demander d'ici le 31 décembre 2024.")